
Cover image source: Source
When you start exploring MLOps, you’ll often run into fancy tools like SageMaker, S3, Google AutoML, AzureML, and others. But you don’t need to get FOMO and jump into them immediately because MLOps is not a platform. You can begin with a simple and free setup that works.
Note: This tutorial is not only designed for entry-level practitioners. I know lot of people doing rustic architecture at scales, no shame, including myself because why not as long as it works and costs less money. You might need more complexity as your system or business scales, but you can always learn on your way.
Okay, enough talking — let’s start! Here is what we will use
1. Beginning
What you need:
- Google Colab
- Google Drive
- PyNgrok
- MLflow
- A bit of creativity
We’ll build and track a simple linear regression model.
2. Set Up Environment and Train ML Model
Step 1: Prepare Google Drive
Create a folder in your Google Drive. This will store MLOps artifacts like models, metrics, and parameter logs.
Step 2: Mount Drive and Install Dependencies
Open a new Colab notebook and run:
!pip install mlflow --quiet!pip install pyngrok --quiet
from google.colab import drivedrive.mount('/content/drive')
%cd /content/drive/MyDrive/mlflow/linear3. Launch MLflow and Ngrok Tunnel
Start the MLflow UI on port 80:
import osimport warningsimport sysimport pandas as pdimport numpy as npfrom sklearn.metrics import mean_squared_error, mean_absolute_error, r2_scorefrom sklearn.model_selection import train_test_splitfrom sklearn.linear_model import ElasticNetfrom urllib.parse import urlparseimport mlflowimport mlflow.sklearnimport logging
logging.basicConfig(level=logging.WARN)logger = logging.getLogger(__name__)
get_ipython().system_raw("mlflow ui --port 80 &")Set up Ngrok
Get your token from ngrok.com and save it in a text file:
from pyngrok import ngrok
# Terminate open tunnels if existngrok.kill()
# Read token securely from a filefile1 = open('token.txt', 'r')NGROK_AUTH_TOKEN = file1.readlines()ngrok.set_auth_token(NGROK_AUTH_TOKEN[0])
# Open a secure tunnel on port 80public_url = ngrok.connect(port="80")print("MLflow Tracking UI:", public_url)Now you have a public link to monitor your ML experiments.
4. Define Evaluation Metrics
def eval_metrics(actual, pred): rmse = np.sqrt(mean_squared_error(actual, pred)) mae = mean_absolute_error(actual, pred) r2 = r2_score(actual, pred) return rmse, mae, r25. Train the Model and Track with MLflow
warnings.filterwarnings("ignore")np.random.seed(40)
# Load wine-quality datasetcsv_url = ("http://archive.ics.uci.edu/ml/machine-learning-databases/wine-quality/winequality-red.csv")
try: data = pd.read_csv(csv_url, sep=";")except Exception as e: logger.exception("Unable to download training & test CSV. Error: %s", e)
# Train-test splittrain, test = train_test_split(data)train_x = train.drop(["quality"], axis=1)test_x = test.drop(["quality"], axis=1)train_y = train[["quality"]]test_y = test[["quality"]]
# Hyperparameter tuningalphas = [0.2, 0.3, 0.4, 0.5, 0.6]l1_ratios = [0.2, 0.3, 0.4, 0.5, 0.6]
for alpha in alphas: for l1_ratio in l1_ratios: with mlflow.start_run(): lr = ElasticNet(alpha=alpha, l1_ratio=l1_ratio, random_state=42) lr.fit(train_x, train_y)
predicted_qualities = lr.predict(test_x) (rmse, mae, r2) = eval_metrics(test_y, predicted_qualities)
print(f"Elasticnet model (alpha={alpha}, l1_ratio={l1_ratio}):") print(f" RMSE: {rmse}") print(f" MAE: {mae}") print(f" R2: {r2}")
# Log params and metrics mlflow.log_param("alpha", alpha) mlflow.log_param("l1_ratio", l1_ratio) mlflow.log_metric("rmse", rmse) mlflow.log_metric("r2", r2) mlflow.log_metric("mae", mae)
tracking_url_type_store = urlparse(mlflow.get_tracking_uri()).scheme if tracking_url_type_store != "file": mlflow.sklearn.log_model(lr, "model", registered_model_name="ElasticnetWineModel") else: mlflow.sklearn.log_model(lr, "model")This loop trains models for various hyperparameters and logs each run in MLflow.
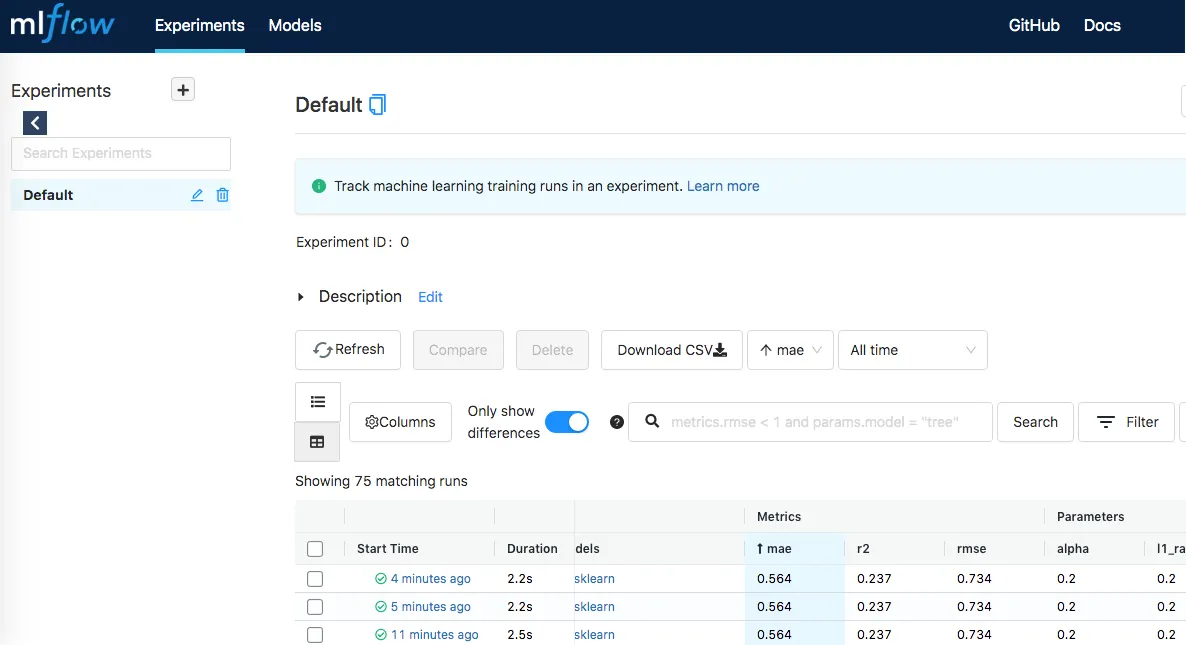
6. Monitor Your Experiments
While training, you can use the Ngrok URL to monitor and compare experiment runs via the MLflow web UI.
7. Locate the Artifacts
After training, your results will be stored under the mlruns directory inside your Google Drive folder.
You can check the experiment ID in the UI (e.g., 33e9f65687374b0b89c87624a8bef70f) and use it to find logs, parameters, metrics, and saved models — all ready for reuse or deployment.
That’s All!
This is a simple but functional end-to-end MLOps practice using nothing but free tools — perfect for beginners or anyone needing a lightweight workflow without cloud overhead.
You don’t always need enterprise tools to do serious work. Just some free services, smart use of notebooks, and curiosity to explore.
References
Epilogue
Starting out in MLOps doesn’t have to be expensive or complicated. As this tutorial shows, you can build a functional, end-to-end pipeline using free and accessible tools like Google Colab, Drive, MLflow, and Ngrok.
If costly cloud platforms or complex setups feel overwhelming, remember: you can always find your own way as long as you have craftmanship mindset. Begin with what you have, keep learning, and gradually scale as your needs grow.
The path to mastery often starts with humble, practical steps, and every expert was once a beginner.
Keep exploring and keep building!